Visual Novel Tutorial - Episode 1: Getting Started with Makko AI
Introduces the Makko workflow for creating a visual novel, focusing on project setup and early narrative structure.

Visual novels are one of the most accessible game formats to start with. The core loop is straightforward: present narrative, offer choices, track consequences, advance the story. No physics engine. No complex combat systems. Just story, state, and player decisions.
That simplicity is deceptive. The moment you introduce branching paths, character sprites, scene transitions, and choice-consequence tracking, you are managing a system with real interdependencies. State has to persist correctly. Choices have to propagate to the right outcomes. Dialogue has to render in the right sequence. Get any of those wrong and the novel breaks in ways that are tedious to debug manually.
This is exactly the kind of system that benefits from agentic AI — a system that plans the full structure before building it, maintains awareness of the dependencies between parts, and handles implementation at the system level rather than line by line.
This tutorial covers Episode 1 of the Makko Visual Novel series: creating your project, working through Plan Mode, approving an implementation plan, reaching your first playable preview, and fixing the most common runtime error new creators hit at this stage.
Episodes 2 and 3 are already available and continue from where this one ends — replacing the placeholder story and backgrounds with your own custom content. But start here first.
Before You Open the Studio: Prepare Your Story
One thing worth doing before you open Makko Studio is having at least a rough version of your story ready. You do not need a finished script — but having a sense of your scenes, your branching points, and the general tone of your narrative will make the planning conversation with the AI significantly more productive.
You can build your story directly with Makko if you prefer — the AI can help you develop narrative structure and branching logic through conversation. But going into Plan Mode with something already in mind means you can answer the AI's questions clearly and precisely, which leads to a better implementation plan from the start.
If you do not have a story ready yet, that is fine. Makko will generate placeholder content so you can see the game working — you will replace it with your own in Episode 2. But the more prepared you are at this stage, the less revision work you will need later.
Step 1: Create Your Project and Choose Plan Mode
Open Makko Studio and create a new project. Give it a title — the example project in this series is called "The Whispers of Destiny" — and add a description as brief or detailed as you like. If you have a GitHub account connected, you can create a repository for the project at this stage. When you are ready, press Create Project.
Once the project opens, you will land in the agentic AI chat interface. Here you will see two mode options: Fast Mode and Plan Mode. For a visual novel — or any project with branching logic and interdependent systems — choose Plan Mode.
Fast Mode generates output immediately. It works well for discrete, well-defined tasks where you want a quick result. Plan Mode performs task decomposition first — it maps out the full structure of what needs to be built before any code is written. For a visual novel, where choice logic, sprite management, scene transitions, and dialogue rendering all need to work together, planning before building is what keeps the project from becoming fragile when you try to extend it.
Your first prompt should tell Makko what you are building and what you need help thinking through. A prompt like this works well:
Press Start Planning and wait for Makko to respond. Keep in mind that AI is non-deterministic — your output will not be identical to what you see in the video, even with the same prompt. The questions Makko asks and the structure it proposes may vary. That is normal and expected. The general shape of the planning conversation should be similar.
Makko will ask you questions across several categories — things like visuals and presentation, story and mechanics, content management, and technical preferences. Take a few minutes to answer all of them. Your answers do not need to be long. Direct and concise is better than detailed paragraphs at this stage. You are setting the foundation for the game, not building it all at once.
What to Cover in Your Planning Answers
The example project in this series is a fantasy adventure story with the following parameters — use these as a reference or take inspiration for your own:
- Genre and tone. Fantasy adventure with branching choices at the end of each scene.
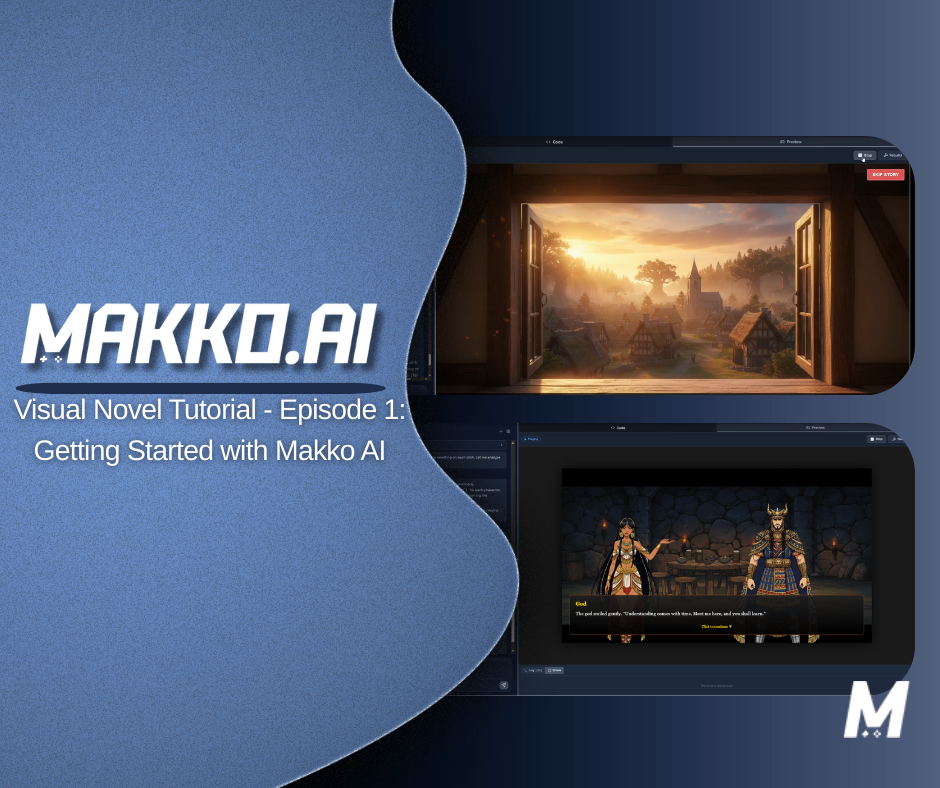
- Visuals. Background images for each scene, with character sprites appearing in scenes where characters are present.
- Text presentation. Narrative text in typewriter format in a dedicated area near the bottom of the screen.
- Troubleshooting tool. A Skip Story button at the top right, allowing faster navigation between scenes during development and testing.
The Skip Story button is worth highlighting specifically. It is not a player-facing feature — it is a development tool. Being able to jump between scenes quickly during testing means you spend less time clicking through dialogue and more time evaluating whether the logic is working correctly. Adding it at the planning stage costs nothing and saves meaningful time during the build.
Once you have answered all of Makko's questions, submit your answers. Makko will generate an overview summarizing everything you provided. Read it carefully. If something does not reflect your intent, tell Makko and it will adjust. If the overview looks correct, confirm it and Makko will generate the full implementation plan.
Step 2: Reviewing and Approving the Implementation Plan
After confirming the overview, Makko generates a Proposed Plan and Approach. This is the full technical blueprint for your project — every task the AI intends to complete, from canvas setup to choice-branching logic to state variable definitions. Read it before pressing Approve.
If the plan does not match your vision, reject it, describe what needs to change, and resubmit. Corrections at this stage are free. Corrections after implementation require the AI to refactor work it has already done, which takes longer and introduces more opportunity for inconsistency.
One thing to know: plan submission can occasionally fail on the first attempt. If it does, simply type "Continue" into the chat and Makko will re-attempt. This is normal and not an indication that anything is wrong with your project.
When the plan accurately reflects what you want to build, press Approve. Makko begins automated assembly. You will see each task being completed one at a time, with a progress bar at the top tracking overall completion. The number of tasks will vary depending on your plan — more or fewer tasks than shown in the video is completely normal as long as the approved plan looked right.
Because the system maintains state awareness throughout this process, the components it builds connect to each other correctly. The choice logic connects to the state variables. The state variables connect to scene transitions. The system is assembled as a coordinated whole, not as isolated pieces you later have to wire together manually.
Step 3: Your First Preview and the Runtime Error You Will Probably Hit
Once all tasks complete, click Preview in the top right, press Rebuild to recompile your code, and press Play. This is the first time you will see what Makko has built.
Even at this early stage, you should be able to see the basic structure working: a main canvas attempting to load a background image, a narrative text area near the bottom of the screen, and a Skip Story button in the top right. Makko will have generated placeholder story content so you can see the game functioning — you will replace this with your own story and backgrounds in Episode 2.
Most errors in Makko can be fixed by clicking the Fix it button that appears alongside the error in the preview. Makko will analyze the error and attempt to correct it automatically. For most issues, this is all you need to do.
However, there is one specific error that the automatic fix cannot resolve on its own, and it is common enough that it is worth knowing about before you hit it:
If you see this, do not use the Fix it button — it will not resolve this particular issue. Follow the manual fix steps in the next section instead.
The XHR Error: What It Is and How to Fix It
Makko embeds JSON data directly into the build and uses a custom fetch method to intercept data requests and serve that embedded data. This is what allows games to run offline and load reliably without hitting a remote server.
The problem is that AI code assistants are frequently trained on older codebases where XMLHttpRequest (XHR) was the standard approach for loading data. When the AI generates code that uses XHR instead of the modern fetch API, those requests bypass Makko's interception entirely. The XHR call attempts to load from a remote endpoint that does not exist in this context, and the error is thrown.
The fix is straightforward:
- Copy the full error message from the preview console
- Paste it into the AI chat
- Add this instruction: "Instead of using XHR, use fetch to fix this issue"
- Submit and let Makko update the code
- Verify the fix by checking the file and line mentioned in the error — you should now see fetch being used instead of XHR
- Go back to Preview, press Rebuild, and press Play
After the fix, your game should load and run correctly. You will see the placeholder story Makko generated playing as intended. For a deeper explanation of why this error happens and what the code change looks like under the hood, see the full XHR to Fetch Migration guide linked in the video description.
Watch the Full Episode 1 Walkthrough
The video below walks through every step in real time — project creation, Plan Mode, implementation, first preview, and the XHR fix — so you can follow along directly in your own project.
What You Have After Episode 1
If you have followed along, you now have a working first version of your visual novel. The game has a functioning canvas, a narrative text area, a Skip Story button, and placeholder story content generated by Makko so you can see the system running correctly.
This is not a finished game. It is a stable, structured foundation built through a coordinated planning and implementation process. The AI understands the project's architecture, the state variables it defined, and the logic it put in place. When you return in Episode 2 to start replacing the placeholder content with your own story and backgrounds, the AI is building on a foundation it helped design — not reconstructing the structure from scratch.
That continuity is what separates a project built through Plan Mode from one assembled through one-shot prompts. The system maintains context. Each iteration builds on what came before rather than starting over. The project grows as a coherent whole.
If you hit issues that are not covered here, the approach is consistent: describe what you are seeing to the AI, be specific about what you expected instead, and let the system correct it. If the automatic Fix it button does not resolve something, paste the error directly into chat with a clear instruction. That feedback loop is how the project improves from session to session.
Quick Reference: What to Do When Something Goes Wrong
Plan submission failed.
Type "Continue" into the chat. Makko will re-attempt. This is normal and not a sign that anything is wrong with your project or plan.
Preview shows an error with a Fix it button.
Click Fix it. Makko will analyze and attempt to correct the error automatically. Rebuild and check if it is resolved. Most errors are handled this way.
XHR runtime error that Fix it cannot resolve.
Copy the error, paste it into chat, and add: "Instead of using XHR, use fetch to fix this issue." Verify the fix at the file and line mentioned in the error, then rebuild.
Something in the plan does not match your vision.
Reject the plan before approving, describe the discrepancy, and let Makko revise. Do not approve a plan that does not reflect what you want to build.
Your output looks different from the video.
This is expected. AI is non-deterministic. As long as the plan you approved looked right, differences in task count or implementation detail are normal. Evaluate based on your approved plan, not on matching the video exactly.
What Is Coming in Episodes 2 and 3
Episode 2 picks up from the working first build and begins replacing the placeholder content with your custom story and backgrounds. Episode 3 continues further — adding character sprites, deeper branching, and refining the visual presentation of the novel.
Both episodes are already available. If you are ready to continue, head to the Makko YouTube channel to watch them now.
The same core workflow applies throughout: describe your intent, review what the AI builds, iterate on the result. As the project grows in complexity, the process stays consistent — which is the point of building on a well-planned foundation from the start.
For more walkthroughs and live demos across all Makko features, visit the Makko YouTube channel.
Related Reading
- How Agentic AI Chat Builds Game Logic
- How Prompt-Based Game Creation Works
- Plan Mode vs Fast Mode: Calibrating AI Reasoning for Game Development
- State Awareness vs One-Shot Prompts: Why Your AI Game Logic Keeps Breaking
- How to Add Animated Characters to a Game Using Makko
- AI Game Generator From Text: How to Build Games Using Natural Language