Why Your Attacks Aren't Registering: Hitbox Alignment Explained for 2D Games
Your attacks miss. Your character gets blocked by nothing. Your collision feels completely wrong. None of that is an art problem. It is a hitbox problem — and this is how you fix it.

Your character attacks an enemy standing directly in front of them. Nothing registers. Your character tries to crouch through a gap they are clearly small enough to fit through. Something invisible stops them. Your character clips through a wall they should be blocked by, or gets blocked by space that looks completely empty.
None of these are art problems. None of these are animation problems. They are hitbox problems. And hitbox problems are almost always caused by the same two things: one hitbox being used for every animation state, and that hitbox being sized to the wrong reference point.
This is the fourth video in the Horror Platformer series, following the journey of Grandma Elara through Granny's Night-Terror. The art is done. The animations are done. The manifest is configured. This video closes the loop — making the character physically accurate inside the game engine for every animation state she has, so the engine sees exactly what you see.
This is part of the broader one character, two games series. If you have not seen the previous episodes, the short version is this: one pixel art character, two completely different games, zero duplication. Every video in this series has added one layer to that pipeline. Hitboxes are the final layer.
What a hitbox actually is and why one box is never enough
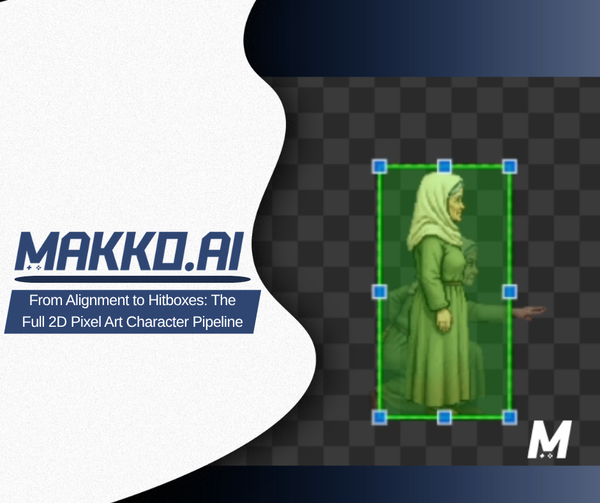
A hitbox is a defined region, almost always a rectangle, that tells the game engine where a character physically exists in the world. It determines when the character takes damage, when they collide with platforms and walls, and when geometry blocks their path. The visual art is irrelevant to this calculation. The engine does not look at the animation and decide what counts as a collision. You have to tell it.
The problem most developers run into is this: a default hitbox gets created when the character is first set up, usually based on the idle pose, and then nothing changes. The idle hitbox gets applied to the run animation, the jump animation, the crouch animation, and every other state. But every animation changes how a character occupies space. A running pose is wider than an idle. A crouch is shorter. A shooting stance extends the arm forward. A jump pulls the legs up and out.
When the hitbox does not match the animation, the engine is working from incorrect information. A crouch animation with an idle-height hitbox means the character cannot fit through gaps they should visually clear. A running animation with a centered hitbox means collisions register where the character is not. These are not edge cases. They are the default outcome of never updating the hitbox per animation state.
The fix is straightforward: every animation gets its own hitbox. Not a shared one. Not a close-enough approximation. One hitbox per animation state, fitted to that animation specifically.
The majority state rule: cover where the character is, not where they reach
Makko's Alignment Editor shows you the first frame of each animation when you go to set the hitbox. That is the only frame you can see while placing the box. This means you are making a judgment call about the entire animation based on one frame, and that judgment call is the difference between hitboxes that work and hitboxes that cause problems.
The rule is this: cover where the character spends most of their time in the animation, not where they reach at their furthest extent.
Here is a concrete example. A shooting animation is 24 frames long. In 22 of those frames, the arms are fully extended outward. In the first 2 frames, the arms are just beginning to move. If you draw your hitbox around only what you see in that first frame, the hitbox is significantly smaller than where Grandma actually is for 22 out of 24 frames. Hits that should register will miss. Players will feel it immediately, even if they cannot explain why.
The correct approach is the opposite of the intuitive one. You are not trying to cover every possible position the character reaches. You are trying to cover the position they occupy for the majority of the animation cycle. Two outlier frames at the start of a motion are acceptable edge cases. Size the hitbox to the 22, not the 2.
If you are unsure what the majority state looks like, go back to the Character Details page, find the animation, and watch the full loop. You will see immediately where the character spends most of their time. Then go back and draw the box there.
Working through each animation state
Idle. The baseline. Grandma is upright, symmetrical, and the idle pose is representative of her standard body volume. The hitbox sits tightly around her core body — not her hair, not where the weapon will be, her body. The parts of her that should be physically solid in the world. This box becomes the reference point everything else is measured against.
Run. The body profile does not change dramatically across the run cycle, but the legs kick back further than the first frame shows. The left side of the hitbox needs to extend slightly further left than the idle to account for the full leg extension during the stride. A small adjustment. A meaningful one.
Jump. The first frame shows the crouch at takeoff. The full arc extends the legs significantly. The hitbox needs to cover the middle ground — accounting for the height at the apex without being so tall it clips floors, and not so narrow it ignores the legs kicking back. One hard constraint here: all tiles in this game are 32 pixels wide, so the jump hitbox cannot exceed 32 pixels in width. The character needs to fit through single-tile gaps cleanly.
Shooter stance. Unlike the run or jump where the majority state is relatively centered, the shooter stance has the arm extended forward for most of its duration. That extended position is the majority state, not an outlier. The hitbox extends forward to cover it. This is the same majority state rule applied differently — the answer just happens to be wider than you might expect.
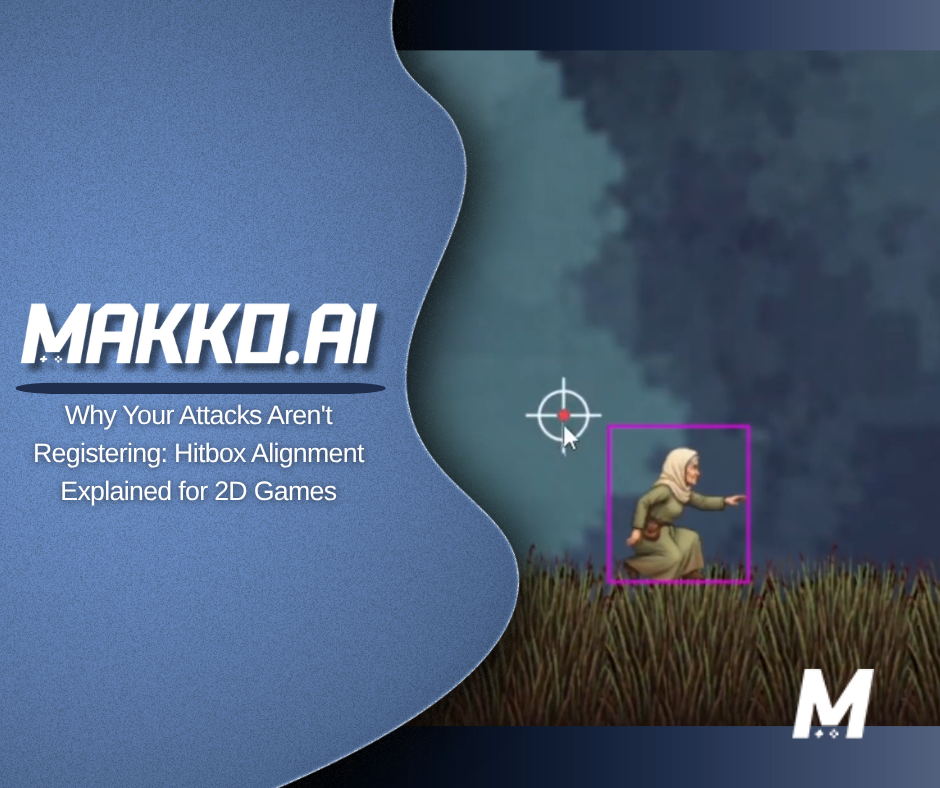
Crouch. The most critical one for this specific game. Grandma needs to fit through single-tile gaps, which are 32 pixels tall. The crouch hitbox cannot exceed 32 pixels in height — and in practice needs to be slightly under that to clear the gaps cleanly without collision. This is the animation that was causing the broken behavior from the opening of the video. Too tall a hitbox here means the character cannot progress through specific level geometry, even when the animation looks like it should fit.
Debug collision boxes: confirming what the engine actually sees
Setting the hitboxes in the editor is not the final step. Testing them in the game is. The Alignment Editor shows a static first frame. It cannot show how the hitbox behaves at gameplay speed, how it interacts with the physics system, or whether anything in the rendering is offsetting it. The only way to confirm hitboxes are working correctly is to watch them in motion inside the actual game.
This is where debug collision boxes come in. The Horror Platformer has a debug box mode built in that renders the hitbox outline over Grandma as she moves. Enable it, run through every animation state, and watch what the engine actually sees. Idle: the box sits correctly around her body. Run: the box tracks with her through the full stride cycle. Jump: the box holds through the arc. Shooter stance: the box extends forward correctly. Crouch: the box is short enough to clear single-tile gaps.
If anything is wrong, the debug view will show it immediately. In the video, the crouch hitbox is caught sitting slightly too tall during this check — just enough to prevent her from clearing the tile gaps she needs to pass through. One adjustment in the editor, a few pixels shorter, and the blocker is gone.
This is the loop: set, test, catch, fix, confirm. Run through it for every animation until the debug view shows clean, consistent collisions across all states. Do not skip this step. The editor gives you a starting point. The game confirms whether it worked.
What the full series built
Four videos. One pixel art character. Two completely different games. This is the full arc of what the series covered:
The manifest system gave us clean, separate game configurations from one source of truth. No duplicate files. No rebuilding the art for each new project. One character, two manifests, two completely different behaviors.
Makko Art Studio gave us genre-specific animations built for the feel of each world — not generic animations repurposed across genres, but animations designed for what each game actually needs.
The Alignment Editor gave us correct scale and anchor points so each game could position the character exactly as it needed, without touching the source art.
And the hitbox workflow closed the loop — making the character physically accurate in the game engine across every animation state, so the engine sees exactly what the player sees.
One character. Two worlds. A pipeline that grows with your project without creating debt you have to manage later.
For detailed walkthroughs and live feature demos, visit the Makko YouTube channel.